Calculating Single-Axis Rotations in 3D Engines
More often than not I find myself wanting to rotate an object by a single axis in a 3D environment and find the game engine has no built-in way to do so: Or rather, the engine may have some way to accomplish this, but it's a bend-over-backwards operation for something so simple. Having the know-how of performing the calculation myself has been invaluable for both my single player and group project for my current 3D-Development course. Below I plan to explain the parts and steps necessary to perform such rotations, using a basic example of 'have an entity face another entity'.
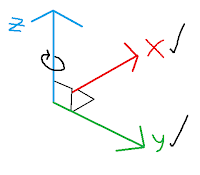


(Figure-1: Representation of angles in the Unreal Engine)
First, we'll need to decide which axis we'll need to affect to rotate the entity appropriately. This decision will change depending on the orientation of the axis on an engine-by-engine basis. Due to Unreal Engine's orientation (see Figure 1), the Z-axis is the 'up-and-down' axis, and therefore is the target axis to affect. Since we'll be applying the rotation to the Z-axis, the X and Y axis'es will be used to calculate the angle (hence the check marks).

(Figure-2: Top Down Angle Representation)
Figure 2 is a top down representation of the axis'es in question. The primary entity who's Z-axis will be rotated is at the center point of the axis rays. The stage is almost set to determine the direction, we just need a target.


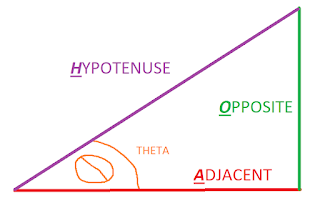
(Figure-3: Trigonometry Triangle)
(Figure-4: Reference Diagram for angle calculation)
As shown in Figure 4, we put in an angry target to represent the direction we ultimately want to face. As shown from the dotted lines, we can see a right triangle form if we drop an altitude (straight line down from a point) from the center point of an enemy. Utilizing basic trigonometry, we can calculate an angle (typically called Theta) which is the angle we'll apply to the target / Z-axis.
As trigonometry is a subject most people try to forget, a quick recap: Somewhere ingrained in your brain cells you should remember the acronym SOH-CAH-TOA. Fun fact, the way I was taught it was "Some Old Hippie Caught Another Hippie Tripping On Acid". Fun fact aside, the pairings of the letters symbolize which trigonometric function to use depending on the sides you know. Figure 3 showcases the correctly labeled sides based on theta (the angle we're trying to calculate) being closest to the origin point of the axis, a.k.a where the primary entity is located. As shown in Figure 4, we can easily utilize the Tan() function by calculating the length of the Opposite side by subtracting the primary entity's y from the target entity's y, and likewise for the Adjacent side with the x components. There's one slight catch, however...
As the trigonometric functions take an angle as input and give you a proportion of corresponding sides based on the used function, this doesn't really help us out much. We need to use trigonometric functions that are the opposite of the base functions, taking in proportions of sides and returning angles. That's where inverse, or arc, trigonometric functions come in (sometimes in programming arc is abbreviated to just A). Since we computed the Opposite and Adjacent sides, we'll use the ATan() function. With the parameters of the difference in y's and the differences in x (in that order) we can finally compute the angle to apply to the primary entity.
Unreal Engine Example:
The primary principles talked about above can be used in any half-decently built game engine, let alone THE powerhouse that is Unreal Engine. A small amount of extra work needs to be put in to get the X and Y coordinates of the entities, but that is a small affair. For this example I created a fresh, third person project and created an empty character blueprint called 'Enemy'. The Player will be the primary entity and the Enemy will be the target entity.
(Figure-5: Getting the target entity's transform component)
We start by getting the entities transform component. However you wish to get the target entity is up to you, but once you have your target simply get his location component of his transform component as shown in Figure 5.
(Figure-6: Get the primary entity's transform component)
Next, we need to get the primary entity's, or 'self'' transform component, like we did with the target entity.

(Figure-7: Compute the new angle to apply to the target axis, in this case we're affecting the Z-axis)
With the location components of the primary and target entity's transform component, we merely, as stated above, subtract the primary entity's Y from the target's y, and similarly with the X component. The order and consistency are key! You don't want to flip flop the subtraction for the X compared to how you performed it for the Y or you'll get unwanted results. You'll also get inverted results if you subtract the target's X or Y from the primary's X or Y, which again, may be unwanted.

(Figure-8: The application of the calculated angle)
With the new angle calculated, it's time to put it all together. We ultimately need to make a new rotator component and apply it to the SetActorRotation node. We pull from the primary entity's transform component the current rotator component so that we can apply to the new rotator component the corresponding axises we aren't affecting. In this example, as we are affecting the Z-axis, we pull the X and Y components of the current rotator component to the new rotator component. From the Atan() function we set the axis we are changing to the new rotator component, in this case the Z-axis.
Final Notes:
Remember, the above method of affecting an axis's rotation can be applied to any axis. If we chose to affect the X-axis, for example, we would utilize the Z and Y-axis'es, or if we chose the Y-axis we'd use the Z and X ones.

Comments
Post a Comment